Home » Articles posted by Nadia Garrett
Author Archives: Nadia Garrett
Dental SEO Expert – What Is a Dental SEO Expert?
Dental SEO is an important part of any dental practice marketing plan. Without it, a dental practice will most likely fall behind competitors who use SEO to grow their business.
Good dental SEO work takes time to show results. It is also something that needs to be constantly monitored. As new search phrases are used, a dental practice will need to adjust its SEO strategy accordingly. Click the https://www.leadhoundsseo.com/ to learn more.

The first step to successful dental SEO is identifying the keywords that best match a practice’s services. Keyword research involves using tools such as Google Keyword Planner and SEMrush to identify the most effective keywords for a dental practice. Ideally, a dentist will target long tail keywords that are specific to their area of expertise and have lower competition. This can help them stand out from competitors and attract patients who are more likely to convert.
The next step is implementing these keywords throughout the website. This can include title tags, meta descriptions, and URLs. It also includes creating a blog and updating it regularly with relevant content. This content can include procedures, dentist bios, FAQs, and even videos. By integrating these keywords into the website, a dental practice can improve its search engine optimization and establish itself as an expert in the field.
In addition to the website, a dental SEO expert can also optimize local listings. This includes ensuring that the practice’s name, address, and phone number (NAP) are accurate across all local business directories and Google Maps. It is also important to promote positive online reviews for the practice.
It is also important to keep in mind that Bing (Microsoft) searches are also important for dental practices. That’s why PatientGain’s Gold and Platinum service plans also include SEO for Bing. In addition, it’s essential to understand that search engine algorithms change frequently, so a dental marketing expert must constantly keep up with the latest updates. This can be done by reading industry news on trusted SEO websites or taking online courses. They should also be able to adapt their strategies quickly when search engine algorithm changes impact the performance of their clients’ sites.
On-Page Optimization
SEO is a complex process that involves keyword and competitor research, optimizing content on the front end of your website and the code behind it, online reputation management, and more. When done correctly, it can lead to higher rankings on search engines like Google, resulting in more visibility and new patients for your dental practice.
A good dental marketing agency understands the importance of SEO and how to make it work for their clients. They also know how to stay up-to-date on the latest SEO trends and algorithm changes. By using these best practices, they can help their clients improve their search engine ranking and compete with other businesses in the same industry.
The first step in dental SEO is on-page optimization. On-page optimization is the process of fine-tuning the content and structure of a website’s individual pages to rank better in search engines. This includes incorporating keywords in title tags, meta descriptions, headers, and content. It also involves using proper hierarchy to signal to search engines what is the most important information on a page.
Another important aspect of on-page optimization is ensuring that the content of your website is accurate and up-to-date. This includes creating unique, relevant, and high-quality content that answers the questions that people are searching for. It is also important to make sure your site loads quickly and has a responsive design that is compatible with all devices.
Dental SEO is a complex and time-consuming process, but it can be extremely rewarding when done right. A good dental marketing agency will help their clients rank higher on search engines, attracting more traffic and ultimately boosting their bottom line. By using a variety of tactics, including local SEO, on-page optimization, and online reputation management, they can position their clients as the premier dental practice in their area.
Off-Page Optimization
A lot of dental SEO work happens outside the website itself. This is known as off-page optimization and it is vital to the success of a dental website. Off-page optimization includes activities like link building and social media engagement. The goal is to get other websites to link to your site. This will increase your authority and trustworthiness. However, you must be careful not to link to low-quality sites. If you do, your site could be penalized by search engines.
Another important element of off-page optimization is content. Dental practices should focus on creating unique, high-quality content. This will help them rank higher in organic searches. This also helps establish their expertise, builds trustworthiness, and increases patient conversions. In addition, dental SEO experts should focus on delivering a great user experience to their patients. This includes making sure that their websites are mobile-friendly, secure, and comply with Google’s Page Experience Signal.
Dental marketing experts are often called SEO experts or SEO professionals, but this can be misleading. The term “SEO” is used to describe a broad set of marketing tactics that can include keyword research, competitor analysis, optimizing content on the front end of the website, optimizing code on the backend, online reputation management, and much more. The best dental SEO practices avoid black hat tactics like keyword stuffing and purchasing cheap or faulty links.
SEO is an essential tool for any dental practice that wants to reach more patients online. It is a cost-effective way to promote a dental office and attract new patients. In addition, it can be very effective at targeting specific keywords that are relevant to the services offered by a dental practice.
Link Building
When you hear the term “dental seo expert,” it usually refers to a professional who can help your dental practice rank higher in search engine results. This will increase your online visibility and bring in more patients. However, this is not a quick fix. It takes time and dedication to get to the top of Google searches.
One of the most important factors in determining your site’s ranking is the number and quality of backlinks. This is because Google uses them to evaluate the authority of your website and its relevance to the search query. In addition, quality backlinks help establish your brand’s expertise, trustworthiness, and credibility.
The key to getting high-quality backlinks is to ensure that they come from reputable and relevant websites. Try to find sites that are related to your industry or niche and have a similar audience. Ideally, you want to get links from sites that have a high Domain Authority (DA). DA is a ranking system that measures the strength of a website. Higher DA websites are considered more authoritative and trustworthy.
Another important factor is making sure your website has complete and accurate information. This includes your address, phone number, and other business details. It’s also important to update your content regularly. For example, if you change your office hours, make sure this is updated on your website and Google Business Profile.
Another way to improve your dental SEO is by creating high-quality content. This can include blogs, articles, and videos. The best content is original and provides value to the reader. It should be readable and easy to understand, and it should also include your target keywords.
Content Writing
A dentist’s website needs to be more than a place where people can schedule appointments. It needs to act as a sales machine, turning casual website visitors into new patients, free consultations, and more. This can only be accomplished through a carefully planned and executed dental SEO strategy.
One of the most important parts of a dental SEO strategy is content writing. This is because search engines now value high-quality, user-centric content more than ever before. Creating this kind of content is no easy task, but it can pay big dividends.
A dental SEO expert can help your dental office create compelling, informative, and educational blog content. This will not only help your site rank higher in Google searches, but it will also position your practice as an authoritative source of information and a trusted authority within the dental community.
While it’s important to focus on the technical aspects of dental SEO, it’s equally important to create content that resonates with your audience. This means avoiding content that sounds overly academic or clinical. Instead, use a conversational tone that reflects real-world human interactions. Inject a little personality into your blogs, and don’t be afraid to make a pun or two.
Another way to make your dental blogs more appealing is to connect them with local events and seasonal topics. For example, a dental blog about how to care for your teeth during a summer heat wave can be an effective way to reach potential patients. In addition, it’s a good idea to encourage patient reviews. These can be posted on your website and social media pages, as well as incorporated into your Google Business profile.
Why You Should Hire a Car Accident Lawyer
Car accidents are incredibly stressful and can have a significant impact on your life. A car accident lawyer will be able to help you recover compensation for your injuries.
Insurers review car accident cases to determine the amount they are willing to pay to resolve your claim. Car accident lawyers ensure that you receive maximum compensation to cover all of your losses and move forward with your life. Contact Dundalk Car Accident Lawyer now!

- They Can Help You Recover Compensation
Whether you use your car to get to work, school, run errands, or go out on the town, it’s likely that your life has been disrupted by an accident. Fortunately, car accidents can often result in financial compensation that can help you cover your medical expenses and other losses. A car accident lawyer can help you recover this compensation and get your life back on track as quickly as possible.
The first step in pursuing a claim for damages is gathering evidence. This can include eyewitness accounts, police reports, receipts for damage to your vehicle and other property, medical records, and expert testimony. In addition, your attorney can investigate the cause of the accident to establish liability and maximize your potential award for damages.
Once you have all the necessary information, your car accident lawyer will prepare a demand for compensation to present to the at-fault party and their insurance company. They will also evaluate the case’s prospects for a successful out-of-court settlement or trial.
Your lawyer will take into account your economic and non-economic losses. Economic damages are those that can be quantified, such as medical bills, lost wages from time away from work, and the value of your damaged vehicle. Non-economic damages are those that can be harder to quantify, such as pain and suffering. A car accident lawyer can calculate the cost of these damages to ensure you receive fair compensation for your losses.
When you meet with a prospective car accident attorney, make sure that they have the resources to handle your case and have the experience to represent you successfully. A large firm may have a team of lawyers, investigators, support staff, and other professionals who will work on your case. In addition, a well-organized office space is a good sign that your lawyer is running a professional business and will treat your case with the seriousness it deserves.
Your car accident attorney will also ask you about your own auto insurance policy, especially any underinsured motorist coverage (UIM). They will need this information in case they need to pursue a UIM claim against the at-fault driver’s insurer if the other driver’s insurance is insufficient to cover all of your damages.
- They Can Save You Time
Car accident lawyers have years of training, experience and practice that put them in a much better position to negotiate with insurance companies than you would be on your own. Often, your attorney can reach a settlement with the other driver’s insurance company well before you have to file a lawsuit. This can save you a lot of time and hassle.
If you’re going to hire a car accident lawyer, it makes sense to choose one who specializes in personal injury law and has extensive experience handling cases that are similar to yours. You can also learn a lot about an attorney’s expertise by reading online client reviews. Just be careful because some reviews may be biased and not based on fact. It’s also a good idea to seek out an attorney who has local offices. These attorneys tend to be more accessible and genuinely committed to helping their clients, rather than being focused on growing their businesses and padding their bottom line.
Your attorney can help you collect and organize evidence for your case, including accident reports, witness statements, pictures, videos and more. They will also work with outside experts, such as retired police officers or private investigators. They can even recreate the accident scene if it’s necessary to prove what happened. This can make your case stronger and improve the odds of receiving a higher payout in the end.
In addition, your attorney can handle all communication with the other driver’s insurance company on your behalf. This can save you a lot of stress, as the insurance company will likely try to shift all or some of the blame onto you. An experienced car accident lawyer knows how to fight back against these tactics and will be prepared to take your case all the way to trial if necessary.
In addition, if you have serious injuries from the crash, your medical bills and lost income can add up quickly. This can cause you to fall behind on your debt, which can attract aggressive debt collectors. Your car accident lawyer can protect you from these illegal practices and negotiate with your creditors on your behalf.
- They Can Help You Navigate the Legal System
Car accident lawyers have in-depth knowledge of the law surrounding car accidents and can make the process much less daunting for you. In addition, they can assist with the necessary paperwork and filing procedures and ensure that all legal deadlines are met. This will help ensure that your case is handled properly and that you don’t run into any issues in the future.
Additionally, a car accident lawyer will be able to deal with the insurance company on your behalf. This is a crucial part of the process because insurance companies often try to minimize payouts or deny claims altogether. However, with a car accident lawyer on your side, you can rest assured that the insurer will be in a position to give you a fair settlement and that you will be able to receive compensation for your losses.
Moreover, your car accident lawyer will be able to accurately value your claim by considering all aspects of your damages and losses. This will allow you to receive the maximum amount of compensation for your medical expenses, lost wages, property damage, and other damages. They will also factor in your non-economic damages, which include things like pain and suffering and loss of enjoyment of life.
Furthermore, a car accident lawyer will be a huge asset in gathering evidence and establishing liability. They can interview witnesses, review police reports and medical records, and work with experts in fields such as accident reconstruction to strengthen your case. In addition, they can handle all communication with the insurance company on your behalf, making it easier for you to focus on recovery.
Finally, if it is necessary to take the at-fault driver or their insurance provider to court, your car accident lawyer will be there to advocate on your behalf in front of a judge and jury. They will present the evidence you’ve gathered and argue persuasively on your behalf to persuade a jury to award you the compensation you deserve.
Car accidents are serious events that can cause major physical and emotional trauma. However, they don’t have to be a life-altering event. By hiring a car accident lawyer, you can rest assured that the proper compensation will be available to help you recover and move forward with your life.
- They Can Help You Save Money
Car accident lawyers can help you get the most money out of your settlement. They can evaluate your case and gather information, such as witness accounts, police reports, medical records, receipts for repair costs, and other documents. They can also communicate with insurance companies and other parties on your behalf. This can reduce the time and effort you need to invest in the claim.
Car crash victims are often required to spend significant amounts of money on urgent medical care for serious injuries. These expenses can quickly add up, leading to massive debts that may attract relentless debt collectors. A lawyer can calculate the total cost of your non-economic losses, such as emotional pain and suffering, to make sure you receive fair compensation.
Your attorney can also help you avoid costly mistakes that could jeopardize your financial recovery. For example, it is not wise to accept early offers from insurance companies, as they are likely lowball and intended to trick you into accepting a lower settlement than what you deserve. A lawyer can also ensure you are considered for all damages, including punitive damages that may be available to punish negligent drivers and deter others from engaging in such behavior.
Other potential mistakes include neglecting to consider your future needs when building a claim, such as ongoing treatment and rehabilitative therapy, or failing to account for the impact of permanent injury on your quality of life. An experienced lawyer can help you avoid these errors and maximize your financial recovery.
It is important to remember that you should focus on your physical and emotional recovery after a car accident. However, you should not have to worry about meeting deadlines or dealing with the complexities of a legal case on top of your other obligations. A car accident lawyer can save you time, money, and stress by handling the details of your case and fighting for fair compensation. Most attorneys offer free consultations, so you have nothing to lose and everything to gain by hiring one. To learn more about the value of a car accident lawyer, contact Perenich Caulfield, Avril & Noyes Personal Injury Lawyers to schedule an initial consultation.
Roofing – A Measuring Process That Requires Attention to Detail and Expertise
The roof is the covering that protects against rain, snow, sunlight, and wind. It also supports gutters, eaves and downspouts that drain water away from the house.
There are many different roofing materials available. Some are energy efficient, durable and low maintenance, while others may be more expensive. They also have varying lifespans. Visit https://www.corpuschristiroofcompany.com/ to learn more.
Choosing the right roofing material is one of the most important decisions that homeowners can make for their home. The right roofing materials will provide protection and increase the value of a home. There are several different types of roofing materials to choose from, including asphalt, wood, composite, metal, solar and slate. Each has its own advantages and disadvantages. It is also important to consider the climate conditions in a home’s location when choosing roofing materials.
Asphalt shingles are a popular choice for homeowners due to their affordability and longevity. They are available in a variety of colors and styles to complement any architectural design. They are suitable for most climates, and can last 15-30 years with regular maintenance.
Slate is an excellent roofing material for homes that want a more natural look. Slate roofs can last up to 200 years and offer a timeless elegance that will enhance any home. However, it is a more expensive option and requires extra support for installation.
Concrete tiles are another roofing material that is highly durable. They are a great option for hot climates, and can withstand high winds, earthquakes and hurricanes. They are also resistant to fire and mold, and have a low water absorption rate.
Cedar shake shingles are another roofing material that is a good choice for homeowners who want a natural and upscale look. These shingles are a mix of cedar and pine, and can last 30 years with regular maintenance.
Tile roofing is a great option for homeowners who want a more classic look. They are made from earthen clays molded into a rolled or interlocking shape and fired for durability. They are a good choice for many climates, and can withstand high winds, hurricanes, earthquakes and tornadoes.
Thermoplastic roof membranes are a newer roofing material that is very durable. They are ideal for flat or low-slope roofs, and are very energy efficient. They are also easy to maintain, and have a long lifespan. This type of roof is commonly used on commercial buildings and industrial structures. However, it is becoming more common for residential roofs as well.
Roofing Installation
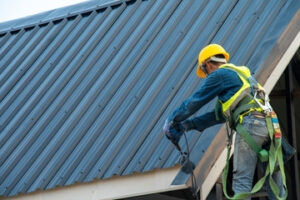
Roofing is a meticulous process that requires attention to detail and expertise. From the initial inspection to completing cleanup, there are many steps involved in a quality roofing installation. Whether you are reroofing your home or replacing an old roof, it is important to work with a reputable contractor. This will ensure your project is done correctly and will protect your property for years to come.
Preparation begins with tarps and wooden boards that are set up around the perimeter of your home to protect landscaping, walkways, and vehicles from any roofing debris that might fall during the installation process. The crew will also cover your attic and pool area, if applicable, to prevent any debris from falling inside.
Once the prep is complete, the roofing material is applied to the underlayment in layers. The shingles are then nailed to the roof using a nail gun or by hand with a hammer. The shingles are overlapped and nailed in a pattern that will prevent water leaks and add to the longevity of your roof.
The next step is to install flashing, which are metal strips that direct water away from critical areas of the roof like chimneys, vents, and valleys. The contractor will also caulk the raw edges of the roof to make it watertight and durable.
Roof ventilation is an essential part of any roofing system. It removes moisture and heat from the attic, preventing damage to the insulation and regulating temperatures throughout the home. Ridge vents, soffit vents, and gable vents are all options for proper ventilation.
The final step is to add the ridge cap, which provides additional protection against weather elements and gives your roof a finished look. It is made of a specialty material and is nailed in place on the top peak of your roof.
The last step is a quality assurance inspection to ensure that the installation meets industry standards, manufacturer specifications, and local building codes. The inspector will verify that all steps have been completed correctly and that your new roof is watertight, airtight, and has the appropriate ventilation.
Roofing Repair
Obviously, roofing is constantly subjected to damage from sun and harsh weather. Depending on the extent of that damage and how serious it is, a roofing repair or replacement might be in order. For minor issues, you can probably do the work yourself or with a helper. You’ll need a few tools, though. These include a pry bar for prying and leveraging sheathing, shingles, and other materials; pliers for grabbing nails or pulling them out; and a utility knife for cutting or removing shingles, flashing, and insulation.
The first step in roof repair is to locate the damaged area and then figure out what needs fixing. To do this, look for dark streaks in the ceiling and deteriorating insulation or other material. It’s important to find these trails, since you will need to follow them to the source.
Once you have located the damaged area, clean it thoroughly and then dry it. Once it’s clean, you can apply a coating of roofing cement to it. You can also use this opportunity to add new vents for increased attic ventilation, or add ice and water sheathing in places where it is often needed.
When you fix flashing, make sure that you match how it was fixed to the roof previously. If the old flashing was nailed, you can usually just nail it back in place. However, if it was sealed with some sort of sealant, you will have to do something else. You can either use a similar type of sealant or roofing cement, which is thicker and might be better for encasing the flashing. In addition, you’ll need to bend the new flashing back into place where it meets a pipe or another surface on your roof.
Roofing Maintenance
A proper roofing maintenance process can prevent minor problems from becoming major issues, and save money. A roof inspection should be performed on a routine basis (ideally biannually) to identify and address problems before they become serious. It should also be done after significant weather events such as heavy storms, tornadoes, and hurricanes to ensure that the damage caused has been repaired.
Inspecting the flashings, which are located at the edges of the roof around chimneys, skylights, walls, equipment curbs, and penetrations, is particularly important since these areas are most prone to leaks. The field of the roof should be inspected to observe surface wear and tear, lap integrity, and UV degradation.
Lastly, it is recommended to trim any tree branches that are too close to the house. This will protect the roof from debris accumulation and potential impact during a storm.
Uneven Heat Distribution Can Cost Homeowners a Lot of Money
Hvac Lexington KY systems are crucial to keeping homes and buildings warm and comfortable. These systems also keep indoor air clean and regulate humidity levels.
Become an HVAC technician through an apprenticeship program. These programs combine classroom instruction with on-the-job experience, giving you the chance to work alongside seasoned professionals and develop practical skills.

Uneven heat distribution is not only uncomfortable, but it can cost homeowners a lot of money. The good news is that there are some easy solutions to address this issue. First and foremost, make sure there is nothing blocking the flow of air in your home. It might sound simple, but this is a very common cause of uneven heating.
If your home has a lot of furniture or drapes in front of vents, it can block the flow of warm air. This can lead to some rooms feeling cold while others feel overly toasty.
Another common reason for uneven heat distribution is an underpowered HVAC system. If your system is too small for the size of your home, it may not be able to adequately heat every room in the house. This can also cause your system to overwork itself, which leads to premature wear and tear.
It’s also important to have the right amount of insulation and air seals in your home. This can help prevent air leaks, which can reduce the efficiency of your HVAC system. It’s also a good idea to replace your filters often to keep them clean and working properly.
A clogged filter can make your HVAC system work harder, which can lead to a number of problems, including uneven heating. The location of your thermostat can also affect how evenly your home is heated. If you have a programmable thermostat, it can save you even more energy and money by allowing you to set different temperature schedules for different areas of the house.
We all know that hot air rises, which means that rooms on upper floors of your home will be warmer than those on the lower level. If you have a multi-story home, this can create a big difference in the temperature between levels.
This can be solved by installing a zoning system, which allows you to control the heating and cooling in each room of your home. A ductless mini-split will give you this option, which can eliminate the problem of uneven temperatures in your home.
Noisy HVAC Systems
Your HVAC system has a lot of moving parts and that’s why it tends to make a few sounds as it runs. While it’s normal to hear some humming, if you notice new or different sounds that aren’t typical it could be a sign that something is wrong with your unit.
A squealing sound often indicates that your fan belt may be about to wear out. It can also be a sign that there is an issue with your blower motor or that a bearing has worn out. A whistling noise can mean that your condenser coil is clogged, or that there is a refrigerant leak. A hissing sound usually points to a problem with the compressor, and can be caused by a refrigerant leak or a valve that needs to be replaced.
Other common HVAC noises include a clicking sound that can point to an issue with your thermostat or relay process. A thumping noise from outside your home can be an indication that the compressor springs are broken or the fan is hitting metal. If the noise is constant or getting louder, it’s time to call an HVAC professional.
Another sound that you should never ignore is a rattling noise. This can be a sign that there are twigs or other debris in the unit, and should be shut down immediately and inspected by a professional.
Other sounds you should not ignore include buzzing or scratching in your ductwork. This can be a sign that you have mice, raccoons or squirrels living in your ductwork, or it could be a sign of undersized or improperly sealed ductwork. In any case, it’s best to have the noises investigated by an experienced HVAC technician. He or she will be able to determine the cause and recommend a solution. This will save you money in the long run by preventing your system from overworking itself to compensate for a faulty part or ductwork. Keeping up with routine maintenance can also help prevent these issues from developing in the first place.
High Energy Consumption
The high electricity consumption of HVAC systems is an important concern because it can result in higher energy bills. However, this problem can be mitigated by implementing energy-efficient practices. These include regular maintenance, changing air filters, repairing or sealing leaks, and installing a programmable thermostat. These measures will help homeowners save money on utility costs and create a greener living environment.
Another factor that impacts HVAC energy consumption is the weather conditions. Hot summers and cold winters require HVAC systems to work harder, increasing their electricity usage. Conversely, moderate weather conditions require less energy to operate. By analyzing the climate and weather patterns in a particular area, it is possible to optimize HVAC system performance and reduce electricity usage.
Studies have shown that indoor air quality (IAQ) significantly affects occupant health and well-being. Poor IAQ can trigger allergies and lead to other diseases. In addition, it can decrease occupant productivity and performance. Considering the fact that people spend more than 80% of their time in buildings, it is essential to design sustainable HVAC systems for better building occupant health and energy efficiency.
Achieving sustainability in HVAC systems is a complicated task, as many factors are involved. For example, the system’s energy usage depends on occupancy, comfort, and energy costs. Using multicriteria decision-making methods can help find the optimum model to meet these criteria.
The energy savings in a home can be significant by using a properly-sized HVAC system, installing insulation, and sealing gaps around doors and windows. It is also a good idea to install a programmable thermostat, which will allow you to set the temperature according to your schedule and avoid wasting energy in unoccupied rooms. You can also improve your home’s energy efficiency by replacing old appliances with new, energy-efficient models. In addition, by hiring professionals to do routine maintenance on your heating and cooling equipment, you can ensure that they are operating at their optimal potential. This will also help you avoid costly repairs in the future.
Poor Indoor Air Quality
Poor indoor air quality is a huge problem that can lead to many health problems, including allergies, asthma flare-ups and even headaches. In fact, over time low-quality indoor air can impair your judgment and cognitive ability as well as make you more prone to disease. This is particularly true for those with respiratory problems, especially if it affects the lungs.
Poor ventilation is the primary cause of bad indoor air, but there are many other sources of pollutants as well. These include vapors from household cleaners, smoking, mold growth and a lack of proper maintenance for the HVAC system. Leaky ducts and dirty filters can also contribute to the issue, which can be addressed with regular cleaning and the use of air purifiers.
Biological contaminants like bacteria, viruses and fungal spores are also common causes of poor indoor air quality. They circulate throughout the home, and are breathed in by people and pets. They can cause symptoms such as headache, fatigue and sinus congestion. If the levels are high enough, these contaminants can also trigger a condition known as sick building syndrome.
Other sources of poor air quality include carbon monoxide, which can leak from furnaces and other appliances, and radon, which is found in many older buildings. These chemicals can have serious and even life-threatening consequences, and can be released into the air by old pipes or poorly ventilated basements.
Chemicals in household cleaners and other household products, such as aerosol sprays, can also be released into the air as they are used. Additionally, odors from cooking, smoking and other sources can become trapped inside the house and remain even after the source is removed.
The best way to prevent poor indoor air quality is to keep the ventilation working properly. Opening windows and using exhaust fans can help to bring in fresh, clean air to replace the stale indoor air. Changing or replacing air filters regularly, and keeping them at the recommended MERV rating, can also improve air quality significantly. It is also a good idea to get your ducts cleaned on a regular basis to avoid the buildup of dirt and dust that can affect your breathing.
The Importance of a Well-Designed Ceiling
Ceilings Perth is an important but often overlooked part of a room’s design. A well-designed ceiling can enhance a room’s visual dynamics and increase its resale value.
To measure your ceiling, you’ll need a tape measure with both imperial and metric measurements, a ladder or step stool, and a pencil for recording your measurements. You may also want to use a spirit level for additional accuracy.
Often considered the fifth wall, ceilings have enormous potential to elevate a space’s overall aesthetics and ambiance. From creative solutions to unique materials and textures, the ceiling is a blank canvas for designers to express their creativity.
The ceiling’s aesthetic should harmonise with the rest of the build, and can be used to create a focal point or simply to subtly enhance a room. Various design options are available, from simple gypsum boards to elaborately detailed coffered and tray ceilings, with each offering a different look and feel.
A ceiling’s aesthetic is also influenced by its shape. A coffered ceiling offers an elegant look that is ideal for traditional and formal rooms, while a tray or sloped ceiling adds drama and a sense of scale. Similarly, a ceiling can be decorated to suit the room’s style, with frescoes and artwork often being used in churches and theaters. A ceiling can also be clad in a range of materials, from plaster and drywall to metal and concrete (e.g. the Viipuri Library).
Ceilings can even be left uncovered, as in the case of the open plenum ceiling popular in modernist buildings or the exposed timber rafters of the UP48 House. This approach allows for a great deal of freedom for creativity, and can work well in many types of building, as long as sightlines are considered to avoid collisions between occupants and structural elements.
In addition to enhancing a space’s aesthetic, a ceiling can be designed to offer functional benefits, such as concealing electrical wires and plumbing systems. This is particularly important in high-rises, where ceiling height can be limited. Often, these systems are hidden within the ceiling’s grid, providing easy access for maintenance without interrupting occupants.
In recent years, ceilings have become a focus for innovation. Many of today’s ceiling finishes include recycled content or renewable sources, and are formulated with thermal insulation to help regulate indoor temperature and reduce energy costs. Several ceiling products can even improve air quality by reducing toxins and off-gassing. By exploring the ceiling’s potential for personalization, architects and designers can make this area of the building a truly standout feature.
Functions
Ceilings provide several functions, including creating a sense of height in a room and helping to keep people out of the rain. They also help to prevent water damage in areas where the roof can leak. In addition, they can serve as a source of light and add warmth to a room. Moreover, they can be used as storage areas. For example, a project in an old mansion in Sao Paulo utilized the space beneath the ceiling to create large closed cabinets for storage.
The ceiling function is a type of step function that is defined by the following rule: ceil(x) = 1. The floor function, on the other hand, is defined by the following rule: floor(x) = 1.
The floor and ceiling functions are often used in mathematics. Both of them are useful in solving complex problems in mathematics, science, and engineering. They are similar to each other in many ways, but have distinct differences. The difference between these two functions is that the ceiling function returns the smallest integer value that is greater than or equal to a given number, while the floor function returns the largest integer value that is smaller than or equal to a given number.
This function can be useful in a variety of applications, such as determining the value of postage stamps or calculating the billing amount of various products. It is also useful in determining the number of items that can be sold in a store. This function is sometimes referred to as the floor function, but this name is misleading. The floor and ceiling functions are not the same, so they cannot be interchanged with each other.
The ceiling function is a special form of the floor function that works for integers and decimal numbers. It can be written as ceil(x) or (ceil(x)). The domain of the ceiling function is all real numbers, and its co-domain is the set of all integers. It has many properties that are similar to the floor function, including the fact that it is an even function and that it has a finite slope.
Materials
Ceilings are made of various materials with different designs and patterns that suit the preferred style and purpose of a room. Some of the common choices for ceiling linings are wood, metal, and gypsum. Each material has its own benefits and disadvantages. The choice of the best material to use depends on a number of factors, including aesthetics, cost, and maintenance requirements.
Gypsum is a soft sulphate mineral that is easy to shape and mold. It is fire-resistant, acoustically insulating, and hygienic. It can be used in place of traditional plaster and can also be applied to wood or oriented strand board (OSB). It can be painted to match walls and other fixtures. It is also easy to install and requires little care.
Timber ceilings are another popular option for home and commercial buildings. They are durable and aesthetically appealing, with their unique textured grain and natural coloration. They are also excellent insulators, with air pockets within the cellular structure that retain heat and cold, and can help to lower energy costs. Timber ceilings can be implemented both suspended and unsuspended, with the latter being an effective alternative to drywall.
Plastic ceilings are another environmentally friendly choice, and can be made of recycled or new plastics. They are often acoustically insulated and designed to resemble other ceiling materials, such as acoustic tiles or acoustic panels. They are available in a variety of colors, finishes, and textures. They are often suspended from a grid system, and can be painted to match other room furnishings.
PVC can be used for both decorative and structural purposes, and it can be easily molded into a wide range of shapes and designs. It is also very resistant to moisture and has good anti-fungal properties. However, it is important to note that it is not recommended for humid areas. It can also be abrasive and may damage other building materials. It is recommended to use a non-toxic, water-resistant sealant when installing PVC. It is also a good idea to use a ceiling fan in humid areas, as this will help reduce condensation.
Installation
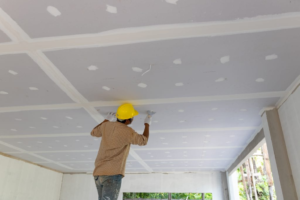
The ceiling is one of the main areas where services such as heating and ventilation ducting, electrical wiring and lighting and plumbing are carried. It should therefore be designed to accommodate them with minimal damage to the ceiling itself. If it is not possible to do this then they should be mechanically fixed to the framing and adequate heat insulation should be used along with sound or noise insulation.
Ceilings are typically constructed using either plaster or drywall. Plaster is applied over a ceiling frame with a trowel, while drywall panels are attached to the ceiling framing with drywall screws. Both can be finished to achieve the desired look and performance, however plaster ceilings are generally more expensive than drywall ceilings.
Another common construction type is the dropped ceiling. This consists of a grid of aluminum struts fixed to the ceiling joists, into which a series of rectangular panels of various materials such as mineral fiber tiles can be inserted and then suspended from the struts. This is a very popular choice for commercial office buildings and can create a striking feature in any room.
A vaulted ceiling is inspired by the interior of a cathedral and gives rooms an open, spacious feel. It can be finished with a simple coving, or with more decorative mouldings and trims. Vaulted ceilings can also be acoustically treated by hanging acoustic panels from the grid.
Before installing a ceiling:
- Make sure you are aware of local regulations regarding the height it can be.
- Mark the ceiling height with a pencil and a spirit level on the walls around the room.
- Use a drywall lift to move the first drywall sheet into position, making sure that it is flush with the wall and that the tapered edges are facing down.
- Repeat the process with each sheet, always ensuring that the edges of the sheet abut each other and are pointing down. If you’re using a ceiling fan, you’ll need to install a junction box that will attach to a joist and power the fan.
This will involve drilling through a structural member, so be careful to follow the manufacturer’s instructions and use the proper tools.
Masonry Repair – Why It’s Important to Address the Root Cause of a Problem
Masonry Repair Long Island should address the root cause of a problem, rather than simply patching up the symptoms. Addressing a brick problem early on will save you from having to repeat repairs later, as well as protect the integrity and value of your home.
As the old saying goes, an ounce of prevention is worth a pound of cure. Pay attention to brick issues when they first appear, and your masonry structure will last for years.

As masonry structures age, they can develop cracks. These cracks are often caused by moisture penetration, structural settlement or erosion. These cracks can be a sign of a foundation problem and need to be repaired to prevent further damage.
The severity of the cracks and the underlying causes will determine how they are repaired. Brick and stone masonry are particularly prone to weathering, which can result in cracks in the surface of walls and buildings. Cracks that are a few bricks wide are generally not a big deal and can be repaired with a simple patch job. However, larger cracks may indicate a more serious issue and need to be professionally repaired.
Smaller cracks in brick or stone masonry can be repaired using an appropriate sized mortar mix that is applied to the face of the wall and allowed to set. This fills the crack and can be finished with a good coat of paint. This is a simple repair that can significantly improve the appearance of any building or structure.
Larger cracks in brick or stone masonry can require a more serious approach depending on the location and other factors surrounding the occurrence of the crack. This could involve a professional assessment of the cause of the cracks to ensure that the appropriate repairs are made.
If the cracks are caused by structural settlement or deterioration, the structure may require a more extensive repointing and grouting to be carried out. This is an additional cost that should be carefully considered by the property owner and a professional surveyor.
Cracks in brick or concrete block walls can also be a sign of problems and need to be looked at by a professional masonry contractor. These cracks may need to be stabilized by bonding HeliBar (helical stainless steel bars) into cut slots in the masonry, which helps to redistribute tensile loads and minimize further development of the cracks. This type of crack repair is generally only recommended under the guidance of a structural engineer.
Sagging
When the mortar between bricks breaks down, it’s not just a cosmetic issue. The damage can also lead to structural problems, especially with concrete block walls. Fortunately, there are a number of different products that can be used to tuck point and restore masonry surfaces.
Whether the mortar between the bricks is failing or a full restoration is needed, the problem should be repaired as soon as possible. Ignoring masonry damage can lead to costly repairs down the road, so it’s important that any damage is addressed immediately.
Cracks and sagging are some of the most common signs that your building is in need of masonry repair. If left untreated, these issues can cause major structural problems and even lead to a building collapse. A good masonry contractor will assess the extent of the damage and recommend appropriate repair services.
The first step in repairing brick wall cracks is to clean the area and remove any debris or loose material. Once the cracked areas have been cleaned, new mortar will need to be applied to the joints between each brick. This is a process that is best done by a professional, as it requires the use of a power tool to get the job done properly.
If the mortar between the bricks is failing, it may need to be replaced completely. This process is called repointing, which involves removing old mortar and replacing it with fresh, strong mortar to reinforce the joints between the bricks.
Brickwork is designed to be as sturdy as possible, and it’s intended that each brick supports the adjacent bricks. However, if the bricks start to crumble and fall away from one another, this can cause serious damage to the structure and pose safety risks for people inside and outside the building.
Crumbling brick is a sign of poor masonry construction, and it’s usually caused by excessive moisture exposure. If the issue is not corrected quickly, it could lead to more severe issues down the line, including foundation damage and water leaks.
The best way to prevent brick deterioration is to keep water away from the structures, as this will stop it from wearing down the mortar and brick. This can be accomplished by keeping water gutters functioning properly, and by directing stormwater away from the brick building.
Leaking
Leaking brick walls are not only unattractive and cause further damage to the masonry structure, but they can also allow water inside, which will eventually erode the mortar, causing further problems. It is important to have any leaking brickwork looked at by a professional mason, as they can easily identify and fix the problem long before it gets out of hand.
Brick walls are very porous and can absorb a lot of water, even if they are sealed correctly. This is why it’s a good idea to do regular inspections of the exterior walls of your building and pay special attention to the areas around any chimney, vents or openings for windows. If you notice water coming through a brick wall, it may be due to a masonry leak and not a roof leak as many people believe.
There are two types of leaks that can result from masonry issues, saturation and void leaks. Saturation leaks happen when the brick is absorbing so much water that it actually starts to crack and crumble. These are more common in colder climates, as repeated freezing and thawing can deteriorate the mortar.
The other type of leaking occurs when the gap between bricks becomes larger over time, due to weathering or improper installation. This can allow in water and moisture, which leads to a number of different problems, including the formation of mold, mildew, rot or sagging bricks.
Efflorescence is a common sign of water infiltration into a brick surface and is usually a white or grayish deposit on the surface of the brick. Masonry experts can remove this by using a specialized chemical that does not damage the brick but is still able to get rid of the residue.
Efflorescence is a very important part of the general masonry repair process and should never be tried as a do-it-yourself project. If it is left untreated, it can lead to further damage and even collapse of the entire brick section of a structure. If you’re looking for a mason who knows their masonry repairs inside and out, contact the professionals at Waterproof Caulking & Restoration today.
Efflorescence
Efflorescence, the whitish powdery substance that appears on the surface of brick, concrete, paving stones and stucco is not only unsightly, but it is also indicative of moisture problems that could eventually lead to major structural damage. Understanding the cause of this unsightly condition is crucial in addressing it quickly and efficiently.
Water is the primary trigger of this condition. It dissolves the salts and minerals present in masonry materials, and as it evaporates, leaves behind the white crystals known as efflorescence. Moisture can be introduced by rain, groundwater or any other source. Temperature fluctuations can also play a role, as they accelerate the formation of efflorescence by encouraging freeze-thaw cycles that create pathways for moisture infiltration.
It is also important to consider the age of the affected building material when determining its origin. If the structure is relatively new, it is likely that it was constructed with contaminated building materials or poor construction techniques that allowed for infiltration of moisture. If the building has been in use for a long time, it is likely that the problem is due to a different cause, such as a leaky roof or chimney.
Once the white crystalline deposits have formed, it is essential to wash and scrub the affected area using only clear water. This will help remove the stains and prevent them from reappearing. It is also a good idea to use a waterproof sealant, which will keep the pores in the concrete or masonry free of water and prevent further penetration.
While this may not completely stop the problem from reoccurring, it is a step in the right direction. If the salts are not removed, it is possible that they will be reabsorbed into the host building material and reappear as more efflorescence in the future.
As with other masonry repair issues, the sooner you address the problem, the better. Leaving it untreated can lead to moisture-related structural damage that is expensive to correct. The experienced professionals at Clean & Polish can help identify the causes of efflorescence and make sure that the building is properly sealed, preventing further moisture intrusion and minimizing the risk of costly repairs in the future.
Chimney Repair – How to Repair a Crack in a Chimney
A professional can fix a chimney crack by remortaring or sealing it. These repairs cost between $150 and $500.
A cracked chimney is dangerous and requires professional attention. It can let water into the masonry and cause major problems. Contact Chimney Repair Baltimore now!
A chimney that leaks can damage the house and furniture, as well as lead to mold and other health issues. Chimneys can also collapse if they’re too damaged to be repaired.
Damaged Mortar Joints
A brick wall’s mortar joints can develop cracking and crumbling, compromising the overall appearance of a masonry structure. In some cases, these issues may also lead to more serious structural problems. To prevent damage and extend the life of the structure, it’s important to regularly tuck point the mortar joints to ensure they’re intact and properly sealed.
Tuck pointing is a delicate process that requires attention to detail and precision to avoid damaging the existing masonry structure. The first step is to assess the condition of the masonry structure and identify areas with cracked or deteriorating mortar joints. Once these areas have been identified, the old mortar should be removed carefully using a cold chisel and hammer to avoid damaging the surrounding brick. Once the masonry has been cleaned, a mortar repair caulk can be applied directly to the joints.
Several factors contribute to the development of damaged mortar joints. Moisture is one of the most common causes, as water can cause mortar to become weak and brittle. This is especially problematic in colder climates, where repeated freeze-thaw cycles can wreak havoc on mortar joints.
Often, it’s best to apply the new mortar using a caulk gun, which can be easier for beginners than a traditional mortar mix. A sanded acrylic caulk such as Quikrete Mortar Repair provides the texture and color of mortar, making it an ideal project for homeowners who are hesitant to tackle more complex projects. Before applying the caulk, make sure the area is clean and free of grease, dust, or loose debris and follow the manufacturer’s instructions for mixing and application. After the caulk has been applied, a masonry brush can be used to smooth and even the joints for a clean finish.
Cracked Crown
A dental crown is a tooth-shaped protective cap that fits over a damaged or decayed tooth to restore its appearance, structure and function. When properly cared for, a dental crown can last a lifetime, but like any other dental restoration, it can be susceptible to damage. When a dental crown cracks, it can lead to significant dental issues that require urgent attention.
Dental crowns can be cracked for a number of reasons. Impacts to the mouth when playing sports or falling can crack a tooth, chewing hard foods can crack a crown, and teeth grinding and jaw clenching can cause them to break. A cracked crown can also expose the underlying tooth to infection and bacteria.
Fortunately, a cracked crown can often be repaired without replacing it completely. Depending on the severity of the crack, treatment options may include dental bonding or composite resin. In addition, a dentist can use a dental veneer to repair a minor chip in a crown.
Some signs of a cracked crown can be localized pain around the crown, a change in its appearance, or the feeling of a loose tooth when biting down or applying pressure to the crowned tooth. A lingering pain after the stimuli have been removed is another indicator of a cracked tooth under a dental crown. Seeing a dentist promptly will allow them to assess the situation and determine the best course of action to protect your dental health. In severe cases, splinting the cracked tooth to neighboring teeth can help stabilize it and prevent worsening of the crack.
Damaged Bricks
While brick is strong and resilient, it can still be susceptible to damage from water. When moisture seeps into a brick chimney it can lead to deterioration and structural problems over time. This is because brick is porous and absorbs water like a sponge. This moisture can cause a number of different problems including spalling bricks and corrosion of metal components such as flue gas and fire dampers.
Chimneys with deteriorating masonry and crumbly mortar should be repaired as soon as possible. This can be done using a process called tuckpointing, which involves removing and replacing damaged mortar with new mortar. When performed properly this repair can restore the strength and stability of a chimney. In severe cases of masonry deterioration, the chimney crown may need to be rebuilt.
Another way to prevent further masonry damage is by applying a breathable waterproof sealant. When this is applied and reapplied at recommended intervals, a chimney can be protected from water damage that leads to further deterioration and expensive repairs.
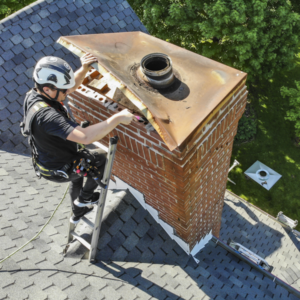
Chimneys can also be protected from water infiltration by caulking the crown and by replacing deteriorating flashings. In addition, a professional chimney sweep can apply a waterproofing agent that will allow the masonry to breathe but will keep water out.
It is important to note that working on a chimney is hazardous and should only be undertaken by a professional with experience in chimney repair. Working on a tall chimney requires special safety equipment, such as a specialized fall-arresting harness that is attached to the ridge of the house and a tool kit that includes a metal hammer and a chisel. This equipment can be rented from home improvement stores and tool-rental outlets.
Leaning Chimney
A leaning chimney is not only an unsightly hazard, but it can also be dangerous. Chimneys can weigh thousands of pounds, and if they topple over onto your home, it can cause serious damage and lead to death or injury.
Several things can cause your chimney to start leaning or tilting. It may be caused by masonry damage that weakens the structure, which can cause a shift in weight that causes it to lean. Older homes often didn’t include a chimney footing, and that can make the chimney prone to shifting over time.
It can also be caused by poor drainage, which allows moisture to penetrate the foundation of your home and slowly erode it over time. This process eventually causes the foundation to crack, which can also contribute to a leaning chimney.
If your chimney starts to tilt, it’s important to contact a professional immediately. They can assess the extent of the damage and provide you with a range of solutions, including a complete chimney rebuild. Many homeowners try to resolve a leaning chimney by filling the gap with masonry, caulk or insulation, but this only hides the problem and doesn’t address the root cause of the shift.
The most effective solution is a foundation repair technique called helical piers. These piers look like giant screws and are driven underneath your chimney footing until they reach a load-bearing soil layer, at which point they’re locked in place with brackets. Once the piers are in place, hydraulic jacks slowly lift the chimney back into its original position. In most cases, this repair can be performed without the high cost and disruption of demolition and rebuilding.
Water Damage
Chimneys are built to withstand the elements, but that doesn’t mean they can’t suffer damage from weather over time. Exposure to wet and wintry weather can cause bricks to crack or chip, deteriorating the mortar between them and leaving gaps that let water into the chimney itself and possibly into your home. These minor issues can become major problems if left unaddressed, affecting the structural integrity of your chimney and allowing smoke and carbon monoxide to enter living areas in dangerous quantities.
Look for signs of water leaks, like stains on your ceilings and walls near the fireplace. You might also notice a chimney leak right around the flashing, where it meets your roof. This is a common place for water to seep into a chimney, and it can be easily fixed with a new flashing and caulk job.
Another sign of water damage is a chimney leak that leads to rot in the masonry. Over time, water that reaches the masonry can freeze and thaw in the winter, expanding its volume and causing the bricks to break apart. This type of water damage is called spalling, and it’s often a sign that you need to replace your chimney.
Both metal and prefabricated chimneys can develop water damage over time, but the best way to avoid it is to have routine inspections and repair any masonry damage as soon as you notice it. It’s also a good idea to have your chimney waterproofed after any repairs are completed to help it withstand the elements for years to come. Contact Able Roof today to learn more about our chimney services, including regular chimney maintenance and inspections.
Materials Used in Dock Construction
When building a dock, following local city and state rules is important. They’ll dictate how large your dock can be and what materials are allowed. For more information, you can visit Dock Lifts Charleston SC to proceed.
Wood is a popular choice for dock construction. It’s rot-resistant and works well in high-moisture areas. It’s also a great option for those who want to match their dock to the surrounding landscape.

Wood is still a popular material choice in dock construction. It has a great visual appeal and is relatively affordable. It requires more maintenance, however, such as annual painting and staining. Wood can also rot, especially when exposed to saltwater.
To minimize this risk, many dock builders use pressure-treated pine. The preservatives used in the treatment process help to protect the wood from fungi and other harmful organisms. The most common preservatives are ACQ and ACZA, which contain copper. These compounds have been shown to leach into the water column and sediment at high concentrations, which can lead to environmental problems. Some states have banned the use of these chemicals in water-based treatments.
In addition to the type of wood, the pilings that make up a boat dock must be strong enough and resilient to resist the forces exerted by the water. This is especially true when building in saltwater or areas prone to surges and other natural water fluctuations. Natural marine timbers can be used, but it is recommended to use a hardwood that stands up particularly well to the water, such as ipe.
When constructing a dock, the first step is compiling a list of materials and tools required. Depending on the size and location of the pond, this will include everything from the dock frame itself to decking material. The pond configuration, bottom composition, and potential fluctuation levels will also impact the type and size of the dock to be constructed.
Once the dock footers and outer posts are in place, the construction of the main dock structure can begin. The frame is built to the previous measurements and specifications, and then the decking material is attached. Once the dock is complete, it should be inspected and double-checked for squareness.
If you are thinking of building a floating dock, it is important to consult with experts and follow the proper construction techniques to ensure a safe and long-lasting product. It is also advisable to consult with local authorities regarding any regulations and permits that may be required for the project. In addition, a plan for the dock’s layout and intended use should be drawn up in advance to determine the best construction materials.
Concrete is often used to add strength and durability when building a dock. It can also help with water quality. This is because it is impervious to water, meaning it will not degrade as fast as wood or other materials. Concrete is also a great choice for those who want to add seating and other amenities to their dock.
When using concrete to build a dock, it is important to remember that the bottom of the structure will need to be secured with anchors. These are usually driven into the ground with heavy equipment. This process can be time-consuming, but it is necessary to ensure that the dock is sturdy and safe. It is also important to plan for construction, as concrete can be difficult to work with.
A dock is a specialized platform designed to facilitate the loading and unloading goods from vehicles and other transporting devices. It is often located in a river, lake, or ocean and can be used for cargo or passenger transportation. Depending on the type of goods transported, the dock can have various features to help with safety and efficiency.
Docks can be made from various materials, including wood, concrete, and metal. Each has its advantages and disadvantages. For example, wood may not be as durable as concrete, but it is often easier to install and can look beautiful in a waterfront setting. However, it is susceptible to rot and other weather damage. Concrete, on the other hand, is more durable and can last a long time if it is properly maintained.
Another benefit of concrete is that it can be easily modified to meet the client’s needs. This is especially important for clients looking to customize their dock design. For example, some clients may want to include built-in benches for seating or need a specific height for their dock. In these cases, a contractor can work with the client to meet their needs and create a custom dock that will be both functional and attractive.
Steel is a common material for pilings and other dock construction projects, especially those near saltwater. It is extremely strong and durable, making it a great choice for building docks that are regularly used or that will be exposed to the elements.
It is also corrosion-resistant, which can concern areas with high moisture and salt levels. This is why using stainless steel hardware when building or repairing a boat dock in Florida is so important for the structure’s longevity.
Another reason that people choose steel is because it’s lighter than aluminum, which can make it easier to install and remove. This makes it a good option for those seeking a more user-friendly dock to maintain themselves. At Pier & Waterfront Solutions, we use galvanized steel in our piers and boat docks because it helps to prevent rusting.
Dock pilings are pipe piling used to create secure foundations for structures built near oceans, lakes, rivers, bays, and other bodies of water. They are typically made from steel, but they can be constructed from various materials depending on the location and the desired structural integrity of the dock or marine construction project.
One of the most popular types of dock pilings is the auger post, which is a long metal screw that is driven into the lake bed. This type of pile is ideal for Muskoka dock building because it minimizes the time the dock is in contact with the lake bottom, which can benefit the environment and allow fish to move freely underneath the structure.
Another advantage of auger dock posts is that they can be installed in less than half the time of conventional pilings, saving time and money during installation. However, using a quality anchor for the piles is essential to ensure they are safe and secure. The most effective anchor is the blind bolt, which provides a one-sided installation and a tight fit into the steel of the dock.
Aluminum is an excellent choice for docks because it won’t rust or corrode like metals such as steel. It’s also very durable, making it a great option for those who want a dock that can last them a long time. However, it does require some maintenance, but it’s still less than what you would need to maintain a wooden dock. Additionally, it’s unlikely that bugs will be attracted to aluminum, so you won’t have to worry about them damaging your dock or posing a safety hazard.
Aesthetics is another reason many build a dock using aluminum frames and decking. Wooden docks offer a more traditional look to the structure but can also be difficult to move or take down seasonally. This makes them more suited to permanent installations than those who want to use their dock to relax and host gatherings. On the other hand, aluminum has a more modern look that some people find appealing. It’s also much easier to keep clean and rust-free.
The type of aluminum alloy used in a dock section is important, and there are both structural and non-structural varieties. Some examples of common aluminum alloys include 6063-t6, which is a strong structural alloy. Other aluminum products that can be used for dock sections include bumpers, fenders, cleats, and different decorative types of hardware.
One of the most significant differences between aluminum and other materials for building docks is that aluminum can make floating or fixed structures. A floating dock is supported by pilings extending into the water and holding the frame above it. This is ideal for areas where the water level fluctuates considerably. Without a floating dock, a person could easily end up on a submerged platform or unable to support their boat.
With a fixed dock, the entire structure is secured to the shore with pilings and headers driven into the lakebed. People install these most common docks and are usually the most secure. They’re also ideal for those who want to avoid the hassle of adjusting their dock heights in response to changing water levels.
What Qualifications Do You Need to Start a Career As a Bricklayer?
Brick Layer Perth WA building materials to construct walls, partitions, arches, and sewers. They may also mix mortar and erect scaffolding and hoists.
Butter the first bricks of every course, gently placing them up against the string line and bedding them into the soft mortar bed. Buttering allows for a full joint, which helps the bricks stay together better.

Bricklayers work with clay bricks, concrete blocks, and other building materials in mortar to construct and repair walls, partitions, arches, and paved areas. They may also build and repair ornamental stonework. They also erect and dismantle scaffolding as necessary. The role can be physically demanding and requires excellent attention to detail. Bricklayers also need to work well in a team and have good construction industry knowledge.
Some key skills that bricklayers need include the ability to read technical plans, strong physical fitness, and the ability to follow instructions. It’s also important that they can work to a deadline and be prepared to work in various weather conditions. They should also be able to use hand and power tools efficiently.
A bricklayer must be able to lay bricks accurately and quickly. They must be able to measure their work area and ensure the rows of bricks are straight. They must also be able to mix mortar and apply it correctly. The ability to cut bricks accurately is also important. Bricklayers usually need a trowel, chisel, or brick saw to shape the bricks.
They must be able to work in various weather conditions and erect and dismantle scaffolding when necessary. They must also be able to follow instructions on important plans and comply with health and safety regulations.
A bricklayer’s job can involve some dangerous tasks. They may need to lift and carry heavy bricks, so they should be fit enough. They should also be able to work with power tools and know the dangers of working at heights.
Bricklayers are normally required to work 39 hours a week. This can sometimes be extended with overtime shifts, especially if the project is urgent or they need to meet a deadline. It is also common for bricklayers to work away from their home base and be required to travel to different construction sites. This can often lead to long commutes and irregular working hours.
It would be best to have a high school diploma and extensive hands-on training to start a career as a Bricklayer. You can get this training by completing a vocational program or an apprenticeship. These programs combine on-the-job learning with classroom education, allowing you to earn money while gaining experience. Most apprenticeships last about three to four years and are offered by unions or employers.
Some colleges offer part-time courses in bricklaying and masonry. These classes are a good way to determine whether this career suits you. Some also offer accelerated programs for those who want to enter the field more quickly. These classes are more expensive than an apprenticeship, but they are worth the investment if you are serious about becoming a bricklayer.
In addition to practical skills, a Bricklayer needs to understand how to read blueprints and other construction documents. A Bricklayer should also be able to interpret work orders and determine the materials required for each task. In addition, they need to work safely on construction sites and know how to use the tools and equipment necessary.
Bricklayers can find work as employees of construction companies, or they can work independently and be self-employed. They can also choose to specialize in certain areas of the profession, such as heritage restoration or stonemasonry. They can also progress to senior roles such as site supervisor or foreperson.
The main difference between bricklayers and masons is that masons learn more advanced techniques and work with various materials. Masonry is an ancient craft, but even today, it continues to play a critical role in the construction industry. Bricklayers build walls, houses, and other building structures. They can also refurbish decorative stonework and work on restoration projects. They often work on teams with other workers and must be able to communicate effectively and follow instructions. They can also become certified in the profession and gain valuable networking opportunities.
Bricklayers use various materials to construct and repair walls, chimneys, paths, and foundations. Depending on their company, they may build commercial, residential, and industrial buildings. Bricklayers also use their skills to create decorative and textured wall surfaces. They must have good problem-solving skills to tackle challenges on a construction site, such as working in tight spaces or dealing with difficult building materials.
As a bricklayer, you’ll often work with other construction professionals, such as carpenters and electricians. Communicating well with these individuals is important for maintaining effective teamwork and ensuring everyone understands the project’s goals. In addition, bricklayers often need to liaise with clients and customers, so excellent customer service skills are also essential for this role.
In some cases, bricklayers may need to work on sites that require them to wear safety equipment such as hard hats and dust masks. They may also be exposed to high temperatures and other hazards such as manual handling of heavy materials, exposure to asbestos, noise, vibration, and working at heights.
Continuing professional development is important for bricklayers to keep up-to-date with the latest laws, best practices, and equipment. This helps them carry out their jobs effectively and safely and ensures they meet all legal requirements. It’s also a great way to stay competitive in the job market.
Many bricklayers work for large housebuilding companies, but there are opportunities to be self-employed and work freelance or on a contract basis. Those working in this field typically need a full driver’s license as they’ll travel between projects. Some roles may provide a company vehicle for this purpose, while others will ask the individual to use their own, which must have business insurance.
Bricklayers enjoy a highly satisfying career as they see their efforts come to life and make a real difference to the world around them. It’s a physically demanding job that can require strong core and arm muscles to lift, push, or pull loads and to work for long periods of time squatting or standing.
Many bricklayers get their training through a college program or apprenticeship, although starting work immediately as a construction laborer and learning on the job is possible. A high school diploma or GED is essential for this career, as it demonstrates commitment and dedication to achieving goals. Continuing education in your field of specialization is also important, as new materials and techniques are constantly emerging.
As you gain experience and build a portfolio, consider seeking professional certifications to boost your resume and improve your employment prospects. These credentials demonstrate that you have reached a certain level of proficiency in your field and can be trusted to produce quality work. It is also a great way to network with other professionals in your industry and find out about job opportunities that may be available to you.
Some bricklayers pursue certification through a local trade union or construction association-run program. This usually involves a three- to four-year apprenticeship program, exams, and a journeyperson certificate. You can also become certified in some provinces and territories by completing on-the-job training technical training and passing the required exams. This qualifies you for an Interprovincial Red Seal, which allows you to work as a bricklayer anywhere.
Taking basic math courses is also a good idea, as bricklayers often need to calculate the amount of brick and mortar required for a project. They must also be able to measure distances between reference points and mark guidelines to lay out the work. A plumb bob and gauge line (tightly stretched cord) are used for this purpose.
Business owner’s policy (BOP) is an important investment for any bricklayer, as it provides general liability coverage in case of an accident or injury on the job site. It can help pay for medical expenses and legal fees, regardless of who is at fault, which helps protect the business from costly lawsuits. In addition, it can cover property damage to buildings or equipment caused by the bricklaying business. Another advantage of a BOP is that it can provide all the necessary insurance coverage for a bricklayer in one policy, which makes it easier to manage and lessens the likelihood of coverage gaps.